
Types of WooCommerce Products
One of the keys to running a profitable WooCommerce store is recognizing the different product types available and taking advantage of them for optimum conversion.
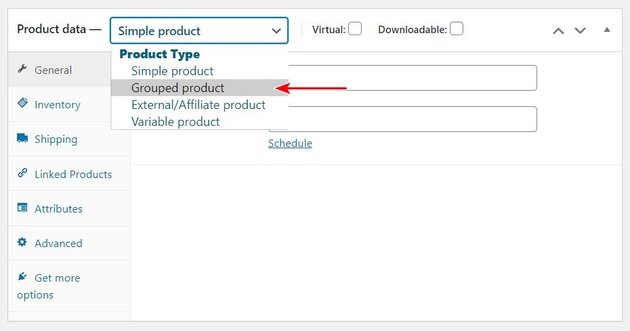
By default, WooCommerce allows you to choose from six types. Each of these product types is unique and lets you conduct a particular type of transaction in your store.
Let’s take a quick look at the default WooCommerce product types and how they differ.
Default WooCommerce Product Types
Creating a specific WooCommerce product type is as simple as tweaking a few settings while editing. Each time you add a new product within WooCommerce, the first editable area in the Product data tab is the type.
Here’s a breakdown of all six default types.
Simple Product
For every average WooCommerce store, the most common product type you’ll probably find yourself using is the simple product. It’s the most basic type and is really easy to use.
A simple product is simply an individual physical commodity (electronic device, shoes, or anything similar.) This is the default type that WooCommerce sets each time you create a new product.
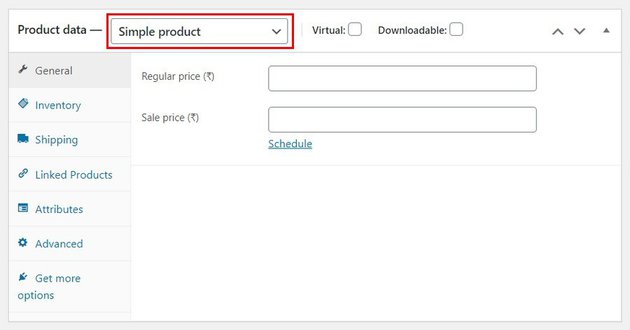
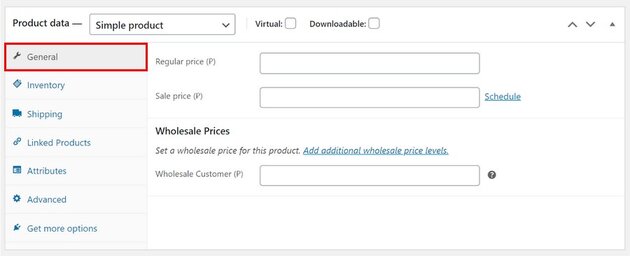
Configuring a simple WooCommerce product is a straightforward process. On the first available tab, General, you get to set the price. WooCommerce allows you to add three pricing tiers to a simple product. You can set a regular price, sale price (discounted pricing) and one or more prices for wholesale customers.
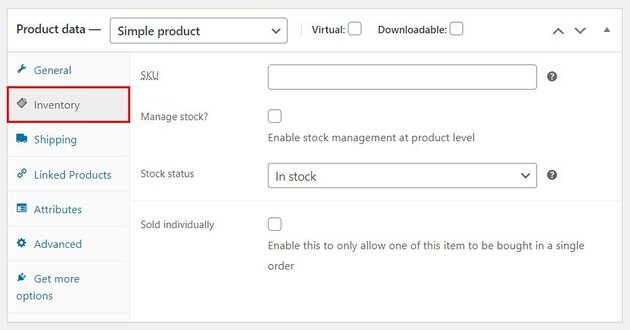
Other data tabs allow you to manage inventory and shipping options. For example, you can automatically monitor the availability of a product by setting the Stock-Keeping Unit (SKU) value.
Similarly, there are options to add linked products, create a custom attribute and other advanced settings such as leaving the customer a purchase note. We’ll look more closely at these options later in this article.
If you want even more functionality, WooCommerce recommends extensions such as ‘Name Your Price’ and ‘One Page Checkout’.

In a nutshell, the simple product reflects WooCommerce’s default approach to adding products to your store. The other types are variations of the simple product.
Virtual Product
The first variation we’ll be considering is the virtual product. As the name implies, a virtual product is a non-physical commodity. This type is ideal for services. It could also be a website subscription.
To create a virtual product, all you need to do is check the Virtual box on the Product data menu. This option is available only after you’ve selected a simple product in the dropdown menu.
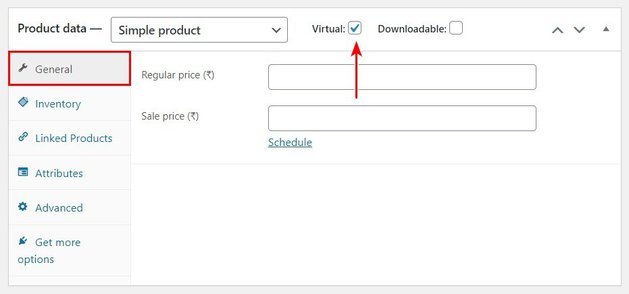
The process of configuring a virtual product is similar to that of a simple one. The only difference is that since it’s a non-physical commodity, the shipping options will no longer be available. So, you won’t have to bother about elements such as weight, dimensions and other shipping details.
Downloadable Product
Another variation of the simple product is the downloadable product. Creating a downloadable product is as simple as checking the Downloadable box in the product data menu.
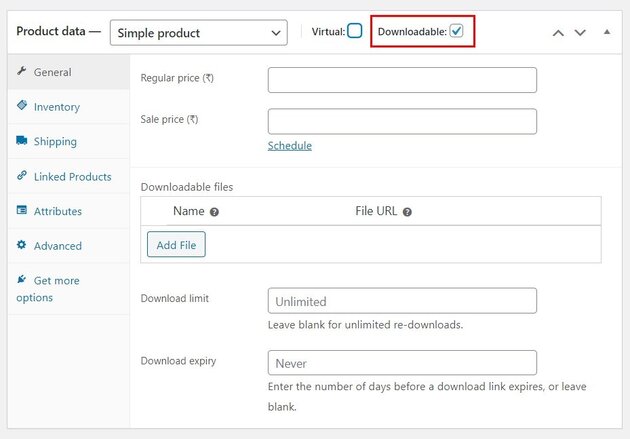
Once you create a downloadable product, additional fields are added to the General tab. These fields let you specify a URL for the downloadable file and set a limit on the number of downloads possible. You can leave that field blank for unlimited downloads.
Similarly, there’s an option to enter a specific number of days after which the download link will expire.
A downloadable product can either be virtual or physical. For example, if you’re selling a music album or book, you may want to offer both a physical and a downloadable product.
To create a virtual downloadable product, check both the Virtual and Downloadable boxes at the same time. This eliminates the tab for editing shipping options as well.
Grouped Product
Unlike the three product types we’ve discussed earlier, creating a grouped product doesn’t create a new unique entry. Instead, a grouped product is a collection of already existing simple products in your store.
To create a grouped product, select the Grouped product option in the Product data dropdown menu.
Since it’s a bunch of linked items, a grouped product doesn’t include a price or other basic options. The main task in configuring a WooCommerce grouped product is to add a number of child products that already exist in your store.
To do this, navigate to the Linked Products tab and search for the items you want to link in the Grouped products field.
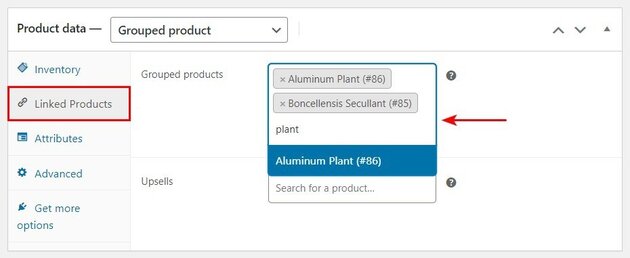
Once you’ve selected the linked products, you can also add upsell items in the tab below. Upsells are items you recommend to the buyer as a better bargain than the group they’re currently viewing.
External/Affiliate Product
This type lets you display a commodity from a different seller. With an external or affiliate product, you can sell an item in your store even if you’re not the actual seller. This way, it’s way easier to collaborate with other sellers and stores.
All you need to configure an external product is to add a product URL and a button text which will be displayed as a Call to Action (CTA.)
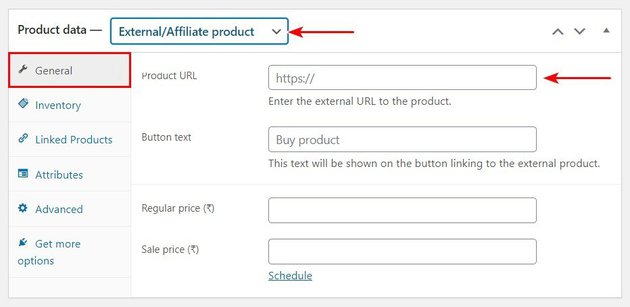
Once you’ve added the product URL and button text, the buyer will be redirected to an external site where they can complete their purchase.
In most cases, you will no longer need to add other details and attributes since they are already listed on the parent site. However, WooCommerce still lets you add these data in case you choose to.
All product data tabs available for the simple product excluding shipping options apply here as well. You can add inventory information, upsell opportunities, custom attributes, and other advanced settings you deem necessary.
Variable Product
The variable product is the last product type WooCommerce has to offer and arguably the most complex. This type makes it possible to add different variations of the same item to your store.
A typical example of a variable product is a shoe or bag with multiple sizes, colors, and possibly slightly different design variations. Electronics store owners can also use this product type to display different storage options and color variants of the same device.
In WooCommerce, you can add a unique price, SKU, weight and other details to each variation.
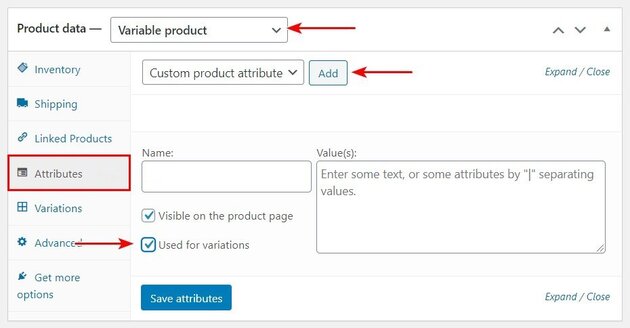
Once you choose the Variable Product option from the Product data dropdown menu, you can navigate to the Variations tab to configure it. However, before you can add variations, you need to first create custom attributes.
To do this, navigate to the Attributes tab. Here, click the Add button adjacent to the Custom product attribute field.
Then, you can add the name and values of the variation. Once you’re done, ensure to check the Used for variations box and click Save attributes.
Now, when you navigate to the Variations tab, you can choose from any of the attribute values you set earlier.
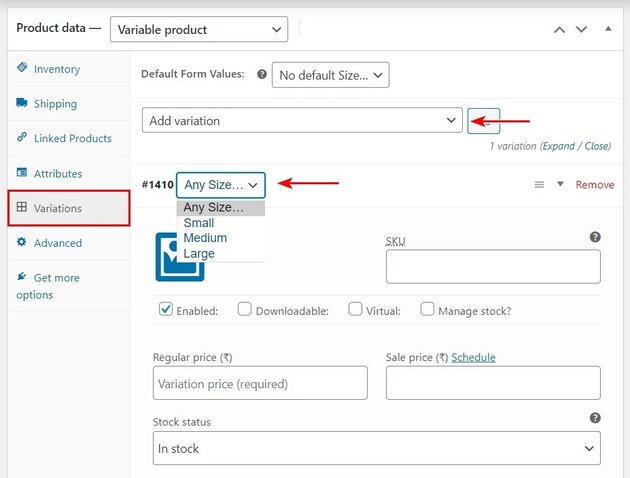
WooCommerce lets you set a default variation value in the Default Form Values field. In our case, this will be a default product size. Similarly, you can add other details such as price and stock status here.
You can even choose to disable an individual variation or make it downloadable and virtual. There is a lot of room for tweaking here and you’ll only get to master your options by creating more variable products.
How to Add WooCommerce Products
Depending on your store’s offerings, adding WooCommerce products can be a very straightforward process. In general, there are five basic steps you need to follow.
Of course, you must have installed and activated WooCommerce before we can even get started.
Step 1: Create a New Product and Add a Title and Description
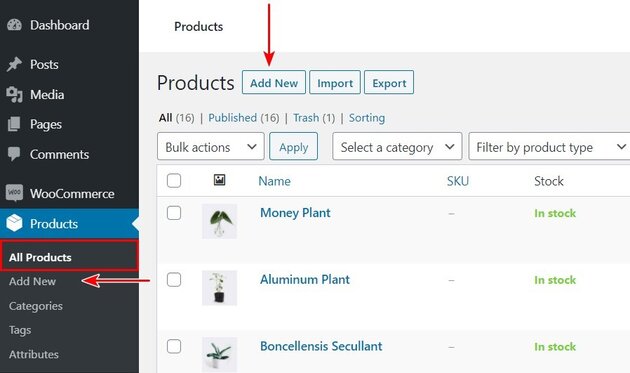
To create a new WooCommerce product, simply navigate to Products > Add New in your WordPress dashboard.
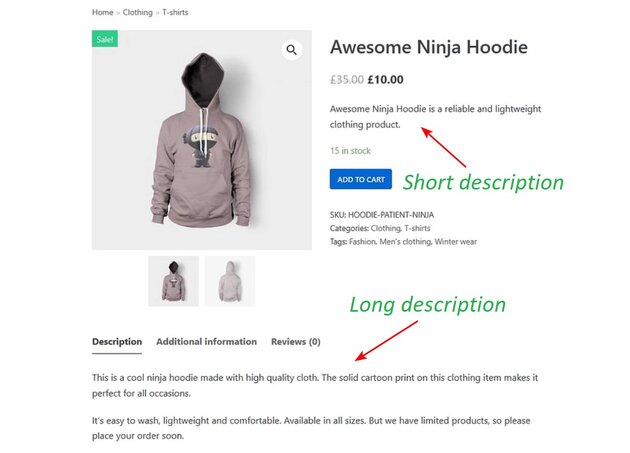
Now, in the Product name field, you need to enter a title . The field beneath should also contain a long description.
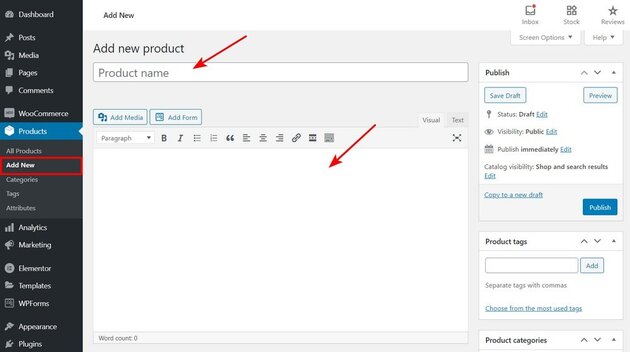
Typically, a long description includes all the important details about your product. These could be its selling points, key facts such as size, color, ingredients, and the likes. You get a lot of room for flexibility here with the standard Classic Editor features. We highly recommend the use of bullet points for better readability.
For great Search Engine Optimization (SEO) performance, ensure to optimize your title and description for keywords.
Step 2: Select a Product Type
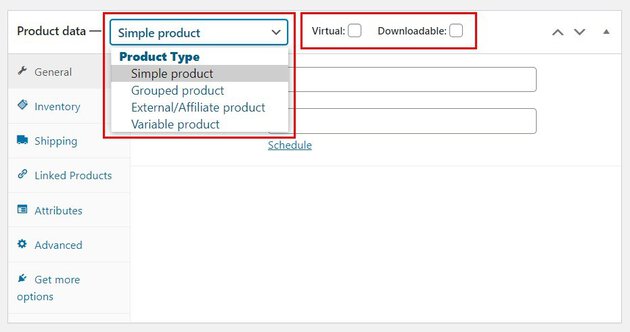
After filling in the product name and description, the next step is to choose the product type. This decides what you’re selling or offering to the consumer.
As mentioned earlier, WooCommerce offers you six product types by default. You can choose a suitable option in either the Product data section’s dropdown menu or the checkboxes beside it.
Similarly, extensions allow you to add more product types such as subscriptions and auctions.
Depending on the type you’ve selected, the data fields will change accordingly.
Step 3: Fill Out the Product Data Tabs
Next, fill in the product metadata. You’ll need to toggle between different tabs (on the left) to get this done.
For a simple product, the General tab basically contains fields for the pricing details (regular and sale prices.) However, if you’ve installed other WooCommerce-compatible plugins, additional fields may be added.
A good example is the Wholesale Prices section featured below.
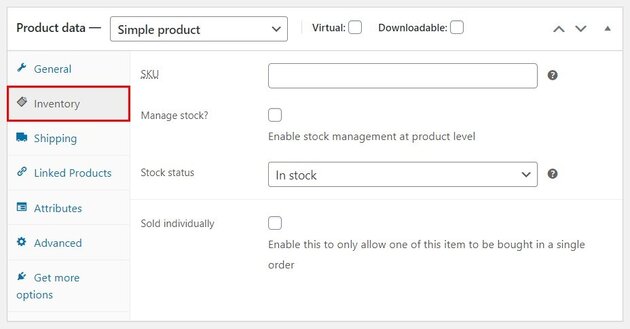
If you’re looking to manage stock, the Inventory tab is where you need to look. Stock Keeping Unit (SKU) refers to the specific number of the product available. The Stock status field informs the buyer when the product is in or out of stock, or lets them backorder it.
Also, you can enable stock management to update your stock automatically or decide to allow the product to be purchased in a single order.
Next is the Shipping tab. This is where you enter all the necessary shipping details related to a physical product. These include weight (in kilograms) and dimensions (in centimeters.)
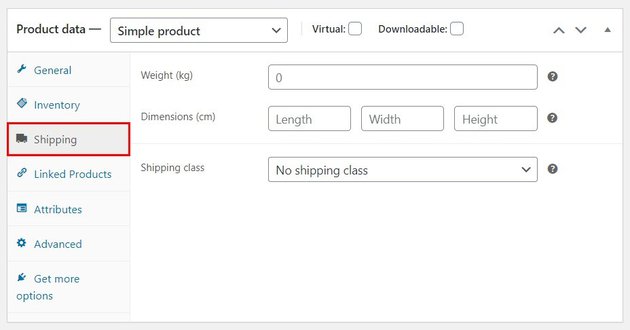
The shipping class is an interesting entry that allows you to group certain products within the same weight limit.
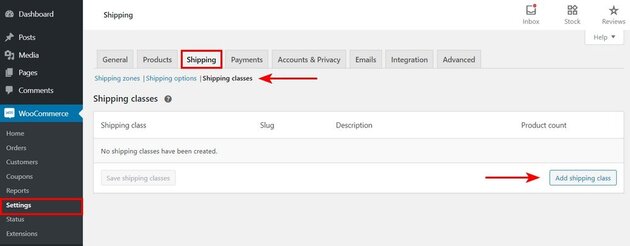
To use this feature, you need to first create a shipping class by going to WooCommerce > Settings > Shipping > Shipping classes. Then click Add shipping class.
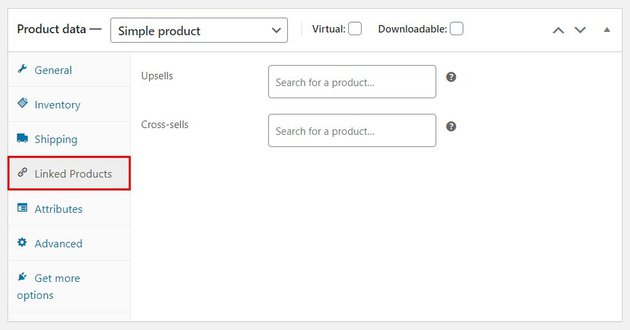
In the Linked Products tab, you can search for other products and add them as upsells and cross-sells. In simpler terms, upsells and cross-sells are often labeled as ‘Recommended deals’ and ‘Frequently bought together’ respectively.
The Attributes and Advanced tabs let you perform tasks such as adding color options to a variable product and leaving a note for customers after completing a purchase.
The last tab – Get more options – recommends official WooCommerce product extensions.
Step 4: Add a Concise and Engaging Short Description
Now that you’ve added the necessary product data, scroll to the Product short description section.
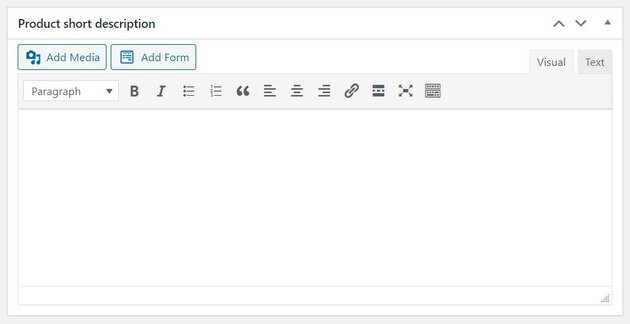
The editing options here are very similar to what you get in the long description box. However, you should probably pay more ‘copywriting’ attention here. In most cases (depending on your theme), the short description is what the site visitor sees first.
A concise well-written 3-sentence (maximum) paragraph is often good enough to sell your product. Similarly, most search engines index the short description faster and more easily.
Step 5: Add Some Finishing Touches and Publish!
At this point, your product page is near ready! But just before pressing the publish button, there are some easy steps you want to take.
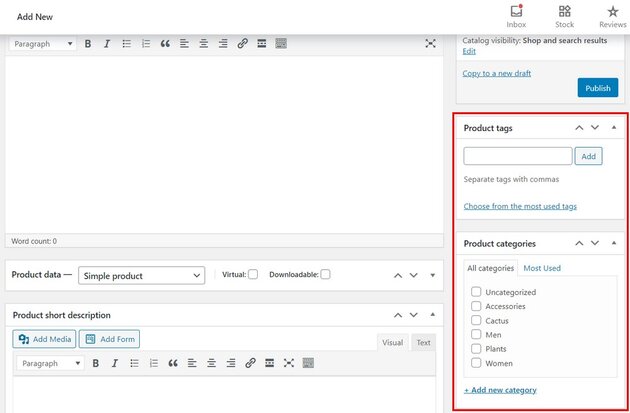
On the right sidebar, you’ll find certain elements you need to complete your product page:
- Product categories and tags – Tags and categories are useful for organizing your products in a manner that makes it easy for shoppers to navigate your store.
- Product image and gallery – This is your product’s main image which appears first on the product page. Add extra images to the gallery to give site visitors multiple views.
After adding these details, you want to go through all the details you’ve entered just to be sure you got everything right. If it all looks good, select the publish button in the upper right corner.
Like any WordPress post, you can choose to preview the product page, schedule it, or simply save it as a draft.