Step 1: Create a New Coupon Code in WooCommerce
From your WordPress dashboard, go to Marketing > Coupons. This will take you to the Coupons page. From this page, click on Add Coupon.
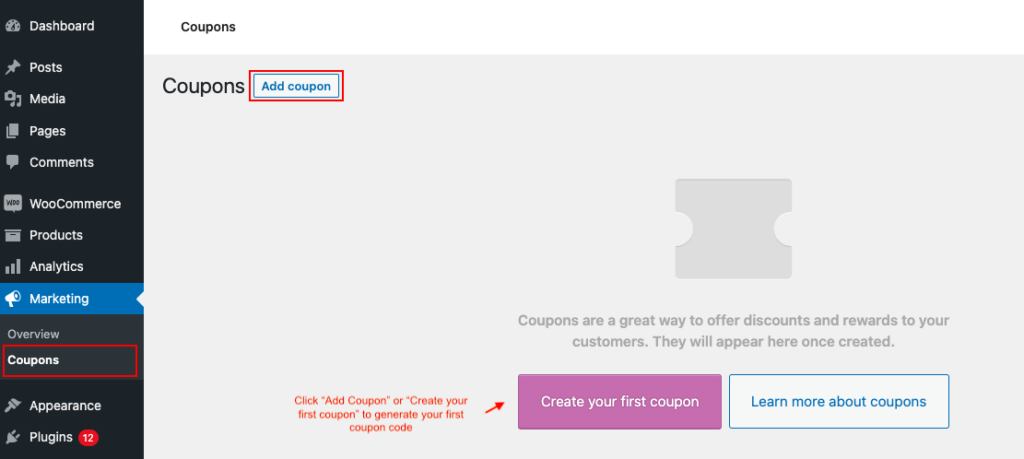
You can create simple WooCommerce coupons, like ‘GET50%OFF’, with this option.
Let’s see how it’s done. Once you click on Add coupon, you will be redirected to the Add new coupon page where you will have to provide the following information.
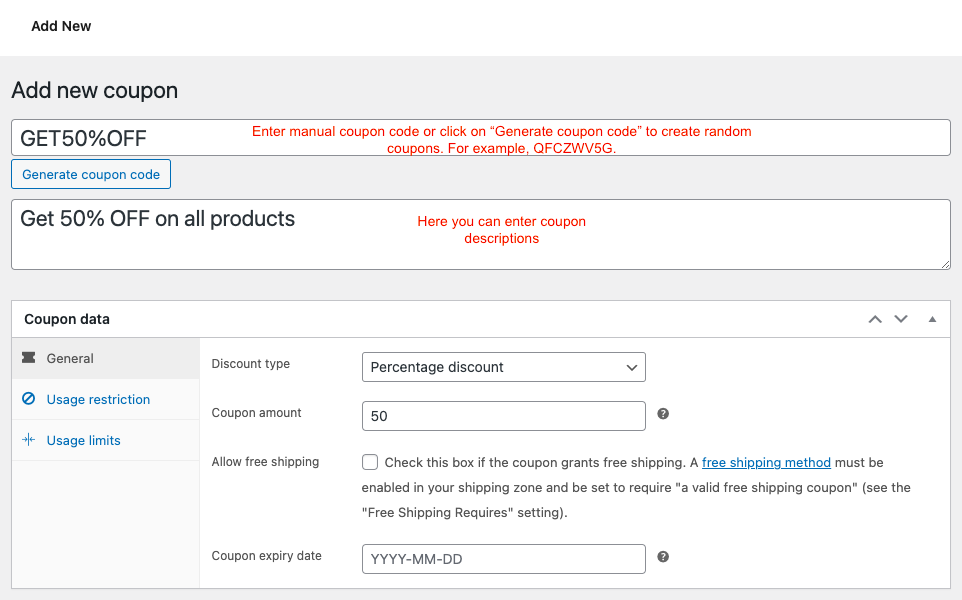
- Coupon code: It refers to the name of the coupon. The coupon code will be visible to the user so go with a catchy yet sensible name.
- Generate coupon code: If you do not wish to provide a custom name for the coupon, click on the ‘Generate coupon code’ button to get a code generated for you.
- Description: This field lets you add a description for the coupon (optional). The description may or may not be visible to the user. The visibility of the description box depends upon the WooCommerce theme that you are working with.
- Coupon data: This is where you can configure coupons using three different options such as
- General
- Usage restriction
- Usage limits
Step 2: Set up Usage Settings for WooCommerce Coupons
To configure all the basic settings of the coupon, go to the General tab under Coupon data.

- Discount type: Specify what type of discount you are offering with the coupon. You can choose any of the following.
- Percentage discount: Deducts a percentage of the cart subtotal from the payable. For instance, if you enter ‘40’, the customer will get a discount of 40% of their cart subtotal (shipping charges and taxes excluded).
- Fixed cart discount: A fixed discount amount will be deducted from the cart subtotal. For instance, if you set the value to be $10 and the customer’s cart subtotal is $100, then they will only have to pay $90 when the discount is applied.
- Fixed product discount: A fixed discount amount will be deducted from the sales price of individual products satisfying the coupon conditions. For example, if the Fixed product discount on an item is $10, a sum of $10 will be deducted from the cart subtotal when the item is added to the cart.

- Coupon amount: Specify the coupon amount for different discount types such as Fixed cart discount, Fixed product discount, or Percentage discount. The entered value will be deducted when purchasers apply the respective coupons.
- Allow free shipping: Check the box to allow free shipping to customers using the coupon.
- Coupon expiry date: Specify the expiration date of the coupon. Note that the coupon will expire at 00:00:00 AM on the specified date.
Step 3: Set Coupon Usage Restrictions
The ROI from a sales campaign can be improved with careful usage restrictions on the coupons. For example, you can create coupons that only apply when a customer purchases $100 or more, thus encouraging your customers to purchase more from your WooCommerce store
The usage restriction also helps you limit users/customers from applying coupons on every item in the store. It also allows you to set up a coupon that can only be used when the cart/product satisfies certain criteria.
The usage restriction settings contain the following components:
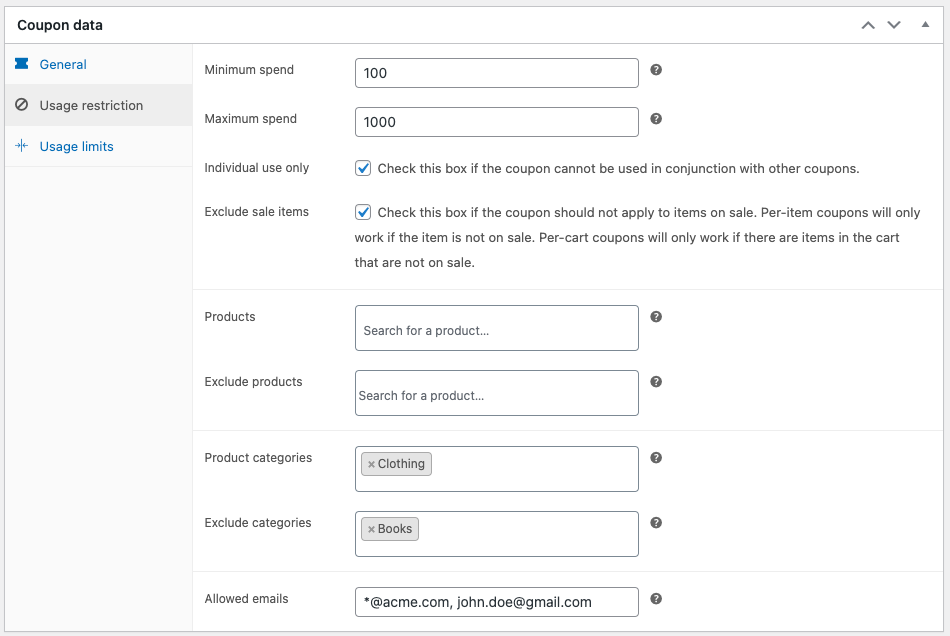
- Minimum and Maximum Spend: Specify a minimum and a maximum cart subtotal that a customer should meet to merit the coupon. Setting minimum spending encourages users to buy more and setting a maximum effectively saves you from sabotaging your profit margin since purchasers have to spend a certain price limit to apply coupons. For example, create a coupon like “Spend $100 More To Get 30% OFF On All Products, Coupon Code – BIGSAVE”
- Individual use only: Use this checkbox so that no other coupons can be applied with this one.
- Exclude sales items: Check this box if you don’t want to provide extra discounts on items that are currently on sale. This way, the Percentage, Fixed cart, and Fixed product discounts will only be applied to the subtotal of the items that are not on sale.
- Products & Product categories: The coupon can only be used on the products or product categories specified here.
- Exclude products & categories: In the case of Percentage and Fixed product coupons, the discount will not be applied to the products or product categories specified here. In the case of a Fixed cart coupon, the coupon will not be applied when a product or category specified here is added to the cart.
- Allowed emails: Add the email addresses of the customers who should benefit from the coupon. Only the users with these email addresses as their billing addresses can use the coupon.
Step 4: Define Coupon Usage Limits
The usage limit customizations enable you to limit customers from excessively using coupons and also help to generate a sense of urgency. For example, a 50% discount for the first 100 customers encourages faster cart conversions and decreases cart abandonment.

- Usage limit per coupon: This section defines how many times the coupon can be used before it expires.
- Limit usage to X items: For the WooCommerce cart, set a limitation that coupon can be applied only if it matches the listed products from this field. For instance, if you are offering a per-item discount on several products but only want it to apply to a maximum of 3 items at a time, set the ‘Limit usage to X items’ as 3. Note: This condition is applicable only for product discounts.
- Usage limit per user: You can determine how many times an individual user should use the same coupon.
Step 5: Publish the Coupon
After you have configured the coupon according to your needs, the final step is to publish the coupon. The published coupons can now be viewed and managed from the Coupons page
Next, place a test order and apply the coupon code in the Coupon code field at the checkout. If you have added coupon restrictions added to the coupons, for example, excluded sale items from the coupon, add them to the cart and check whether the coupons apply to it or not.
Pro tip: You can simultaneously run two different discount campaigns to see which gets the best results. Based on that, develop a coupon strategy and provide customers with the finest offers.
Here’s an example to create and test the WooCommerce coupon,
1. Navigate to Marketing > Coupons in the WordPress dashboard.
2. Choose the discount type as “Percentage discount” and enter the value of 50% (for all products)
3. Save and generate simple coupons “SPRING2025” – with the default WooCommerce coupon
4. Visit your online store and add the required products to the cart.
5. Specify the coupon code and click on “Apply Coupons”.
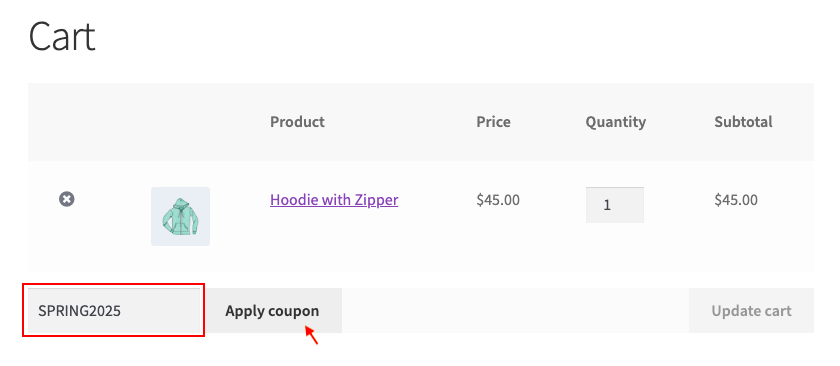
6. The coupon discount will be deducted and the cart total will be displayed as shown.
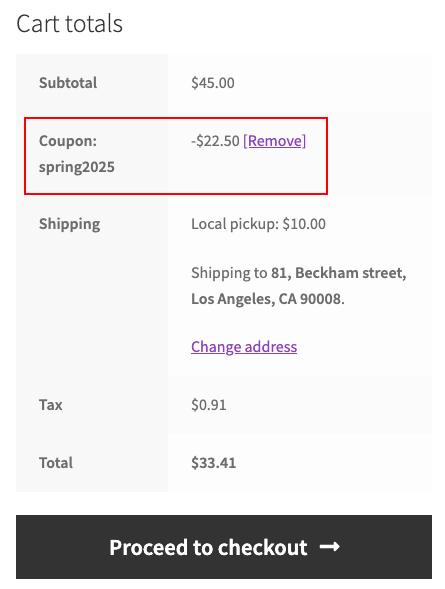
7. Click on “Proceed to checkout” to enter billing information and place the order successfully.